Submitting Computational Jobs on Supercomputer (Tutorial)
In this tutorial, I am sharing how to submit computational jobs using Linux OS on XSEDE Supercomputers. This tutorial assumes familiarity with Linux Centos OS, XSEDE resources and parallel computing.
What is XSEDE?
- The Extreme Science and Engineering Discovery Environment (XSEDE) is a single virtual system that scientists can use to interactively share computing resources, data and expertise.
- The most advanced, powerful, and robust collection of integrated advanced digital resources and services in the world
- A single virtual system that scientists can use to interactively share computing resources, data and expertise
Login to your allocations
SSH & Config
- Connecting to Brdiges
~ user$ ssh bridges.psc.edu -l user
- Connecting to Comet
~ user$ ssh user@comet.sdsc.xsede.org
- SSH Keygen & Configuration on Mac
This is a demo on how to create a public key locally on unix-like system and pair with Comet
- Generate Public and Private Key
~ user$ ssh-keygen

~ user$ cd .ssh/
~ user$ ls
~ user$ cat id_rsa.pub
Check out the public key, since it’s the one we will be sending to the remote machine
Now, let’s copy our public key to remote connection (Comet)
~ user$ scp id_rsa.pub user@comet.sdsc.xsede.org:~/.ssh/authorized_keys
Config file
Let’s use an alias for accessing comet
~ user$ cd .ssh/
~ user$ touch config
~ user$ vi config

~ Host comet
	HostName comet.sdsc.xsede.org
	User <username>
	IdentityFile ~/.ssh/id_rsa

~ user$ ssh comet
Running Jobs
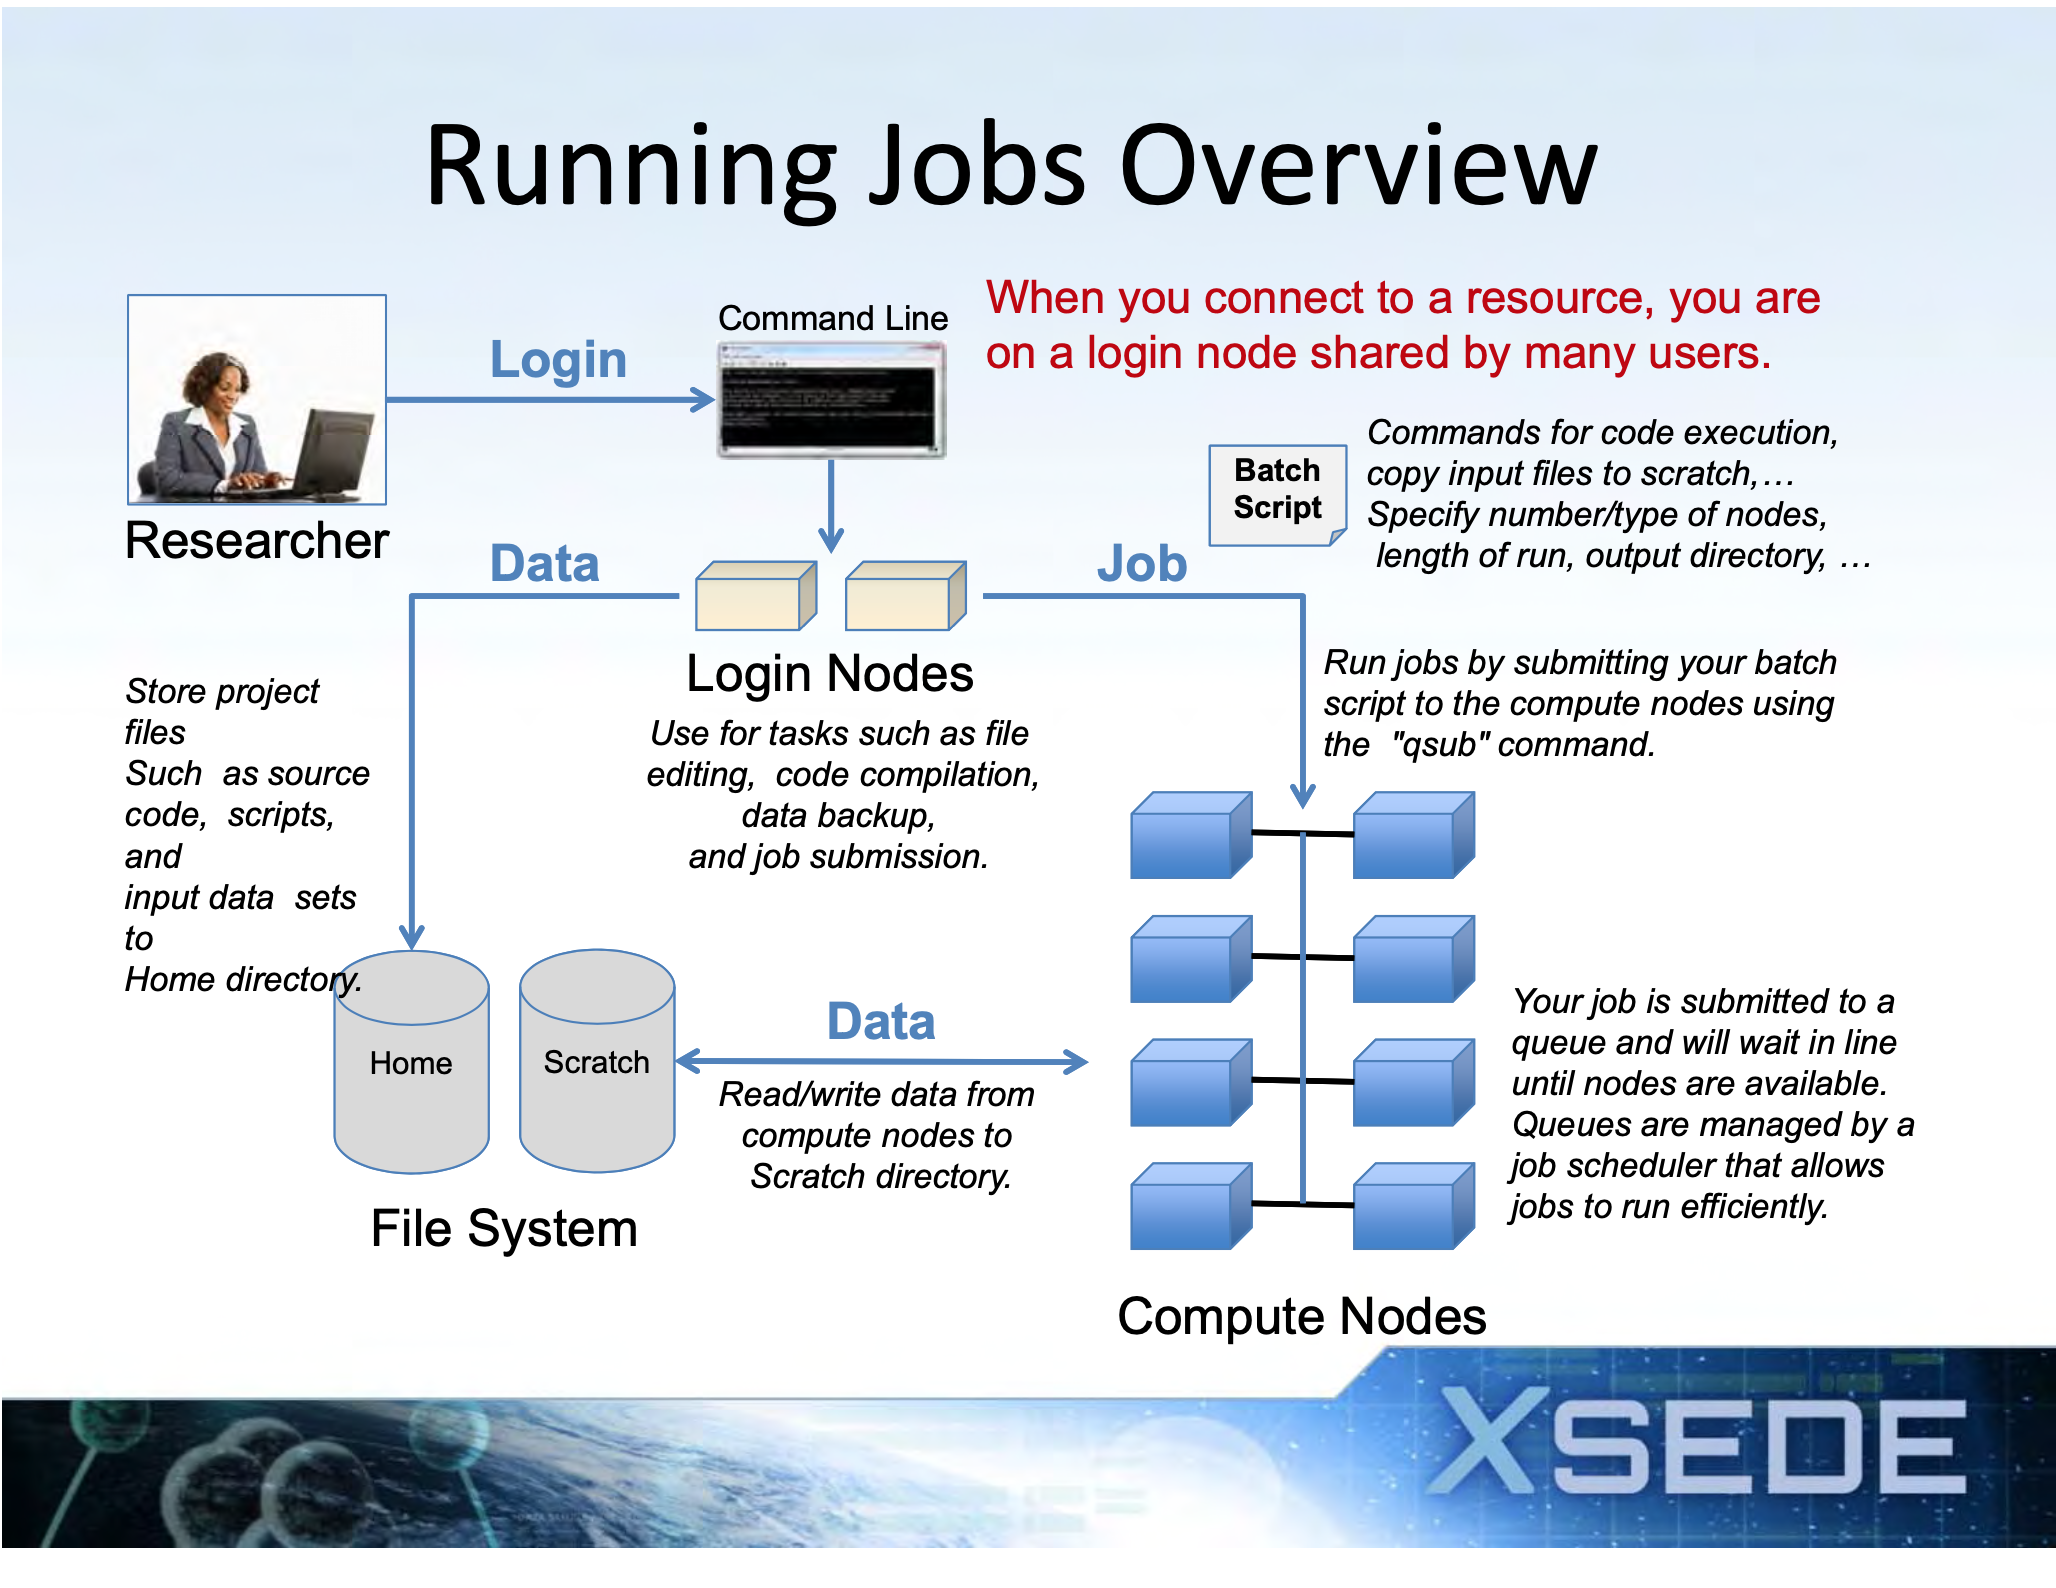
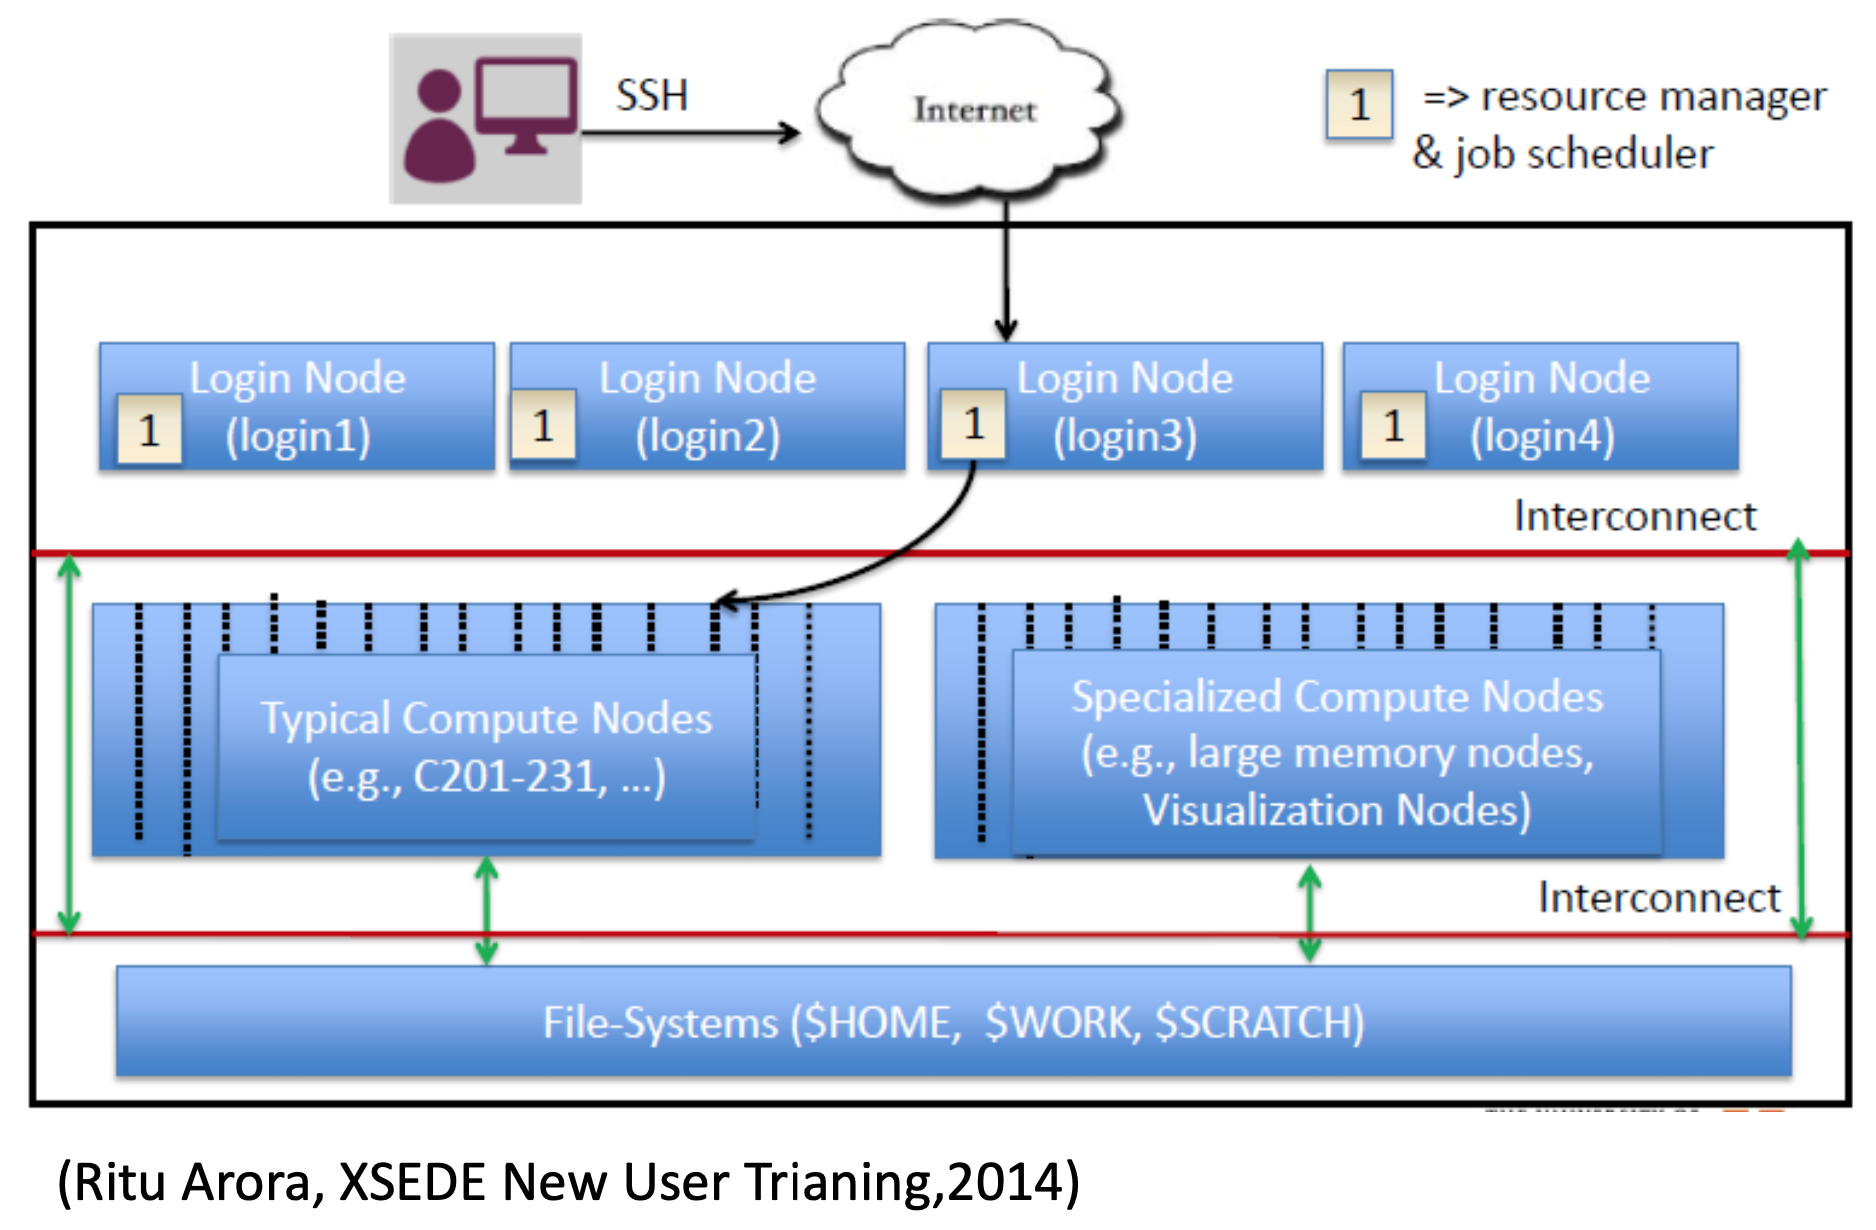
- Login Nodes
- When you login to an XSEDE resource, you connect to a login node.
- Use login nodes for basic tasks such as file editing, code compilation, data backup, and job submission.
- Do not run compute jobs on the login nodes.
- Running Compute Jobs
- Jobs are run on the compute nodes by submitting a batch script on a login node
- All jobs are placed in a batch queue after they are submitted.
- All XSEDE compute resources use a batch scheduler (e.g.SLURM) for running jobs.
- Resource User Guides on the XUP have details on different systems scheduler.
- Batch Scripts
- Batch scripts include scheduler specific
directives, comments, and executable
commands, e.g.:
- Number and type of nodes needed
- Time needed to run the job
- Where to write output files
- Batch scripts include scheduler specific
directives, comments, and executable
commands, e.g.:
- Script commands are system specific – see the resource’s User Guide on the XUP for details
Running Jupyter Notebooks and R Servers
- This can be done through OnDemand software
- Also, can be done through SSH tunneling
Interacting with Python
Multiple versions of python are installed, and they are all accessible via the module command. To see what is available, type
~ user$ module avail python
Be sure to check the help for each version to see useful information about how that version was compiled and whether there are any conflicts with other modules. Type
~ user$ module help python/x.x.x
Add-on packages
Various add-on packages such as numpy, scipy, and the MKL libraries are installed with individual versions. You can see what is available in a given version by first loading the module and then using the pip command:
~ user$ module load python/x.x.x  pip freeze            ##  for python 2
pip3 freeze          ## for python 3
This command will give the version number of the installed packges.
User installed add-on packages
You may also install add-on packages in your own directories. After loading the appropriate python module, use the pip install command:
pip install --user package-name=version-number
If you want to install a specific version of your package, add the optional version-number.