Configuring Data Science Projects on AWS EC2 (Tutorial)
Amazon Web Services
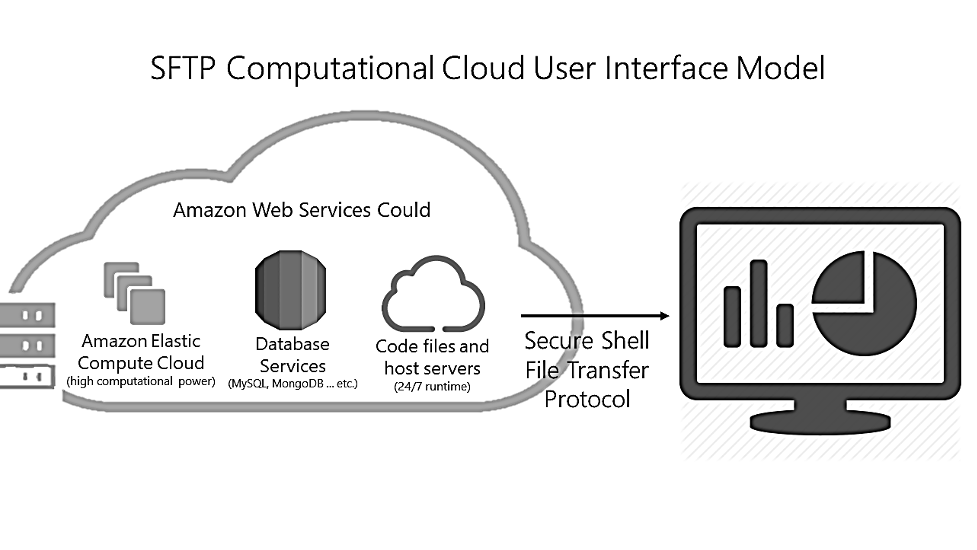
Amazon Web Services (AWS) is a cloud computing and storage services that was chosen to host the development environment about to be presented. AWS offers high-end computational power and compatibility with mass-scale used softwares and technology solutions. The following diagrams presents more information on the features and advantages of using AWS.
Amazon Elastic Compute Cloud
Amazon Elastic Compute Cloud, or EC2, is one of the services offered on AWS. EC2 is an on-demand computational service billed on hourly basis. The aim of using EC2 is creating a virtual machine that will run the codes and store code files as well as big data files. To create a virtual machine on EC2:
- Go to http://aws.amazon.com and create an account
- Under services tab at the top of the counsel homepage look for EC2 and press on it
- Press the blue button that says Launch Instance
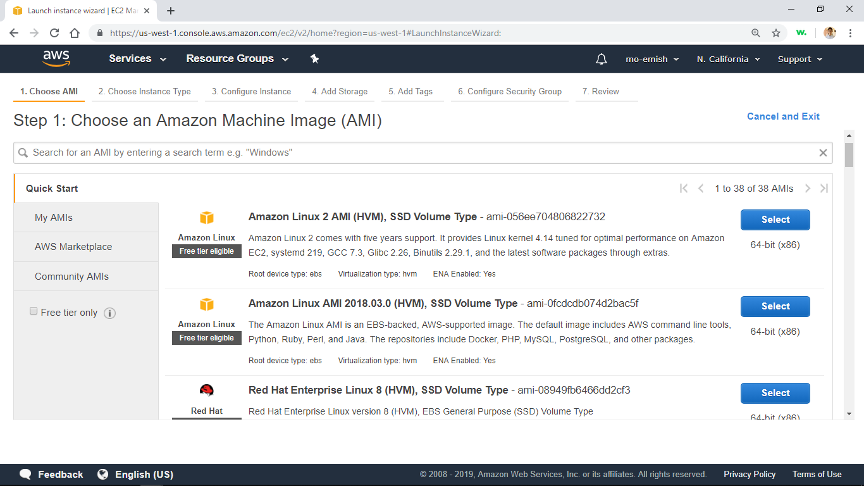
- Next you will be asked to choose the operating system. For our purposes, please choose Amazon Linux AMI 2018.03.0 (HVM) as shown in the figure below
- You will be asked to select the specifications of the machine. For our purposes, we chose t3.xlarge machine with the following specifications (4 processing cores, 16 GBs of ram) Choose a machine and press the white button that says Next: Configure Instance Detials
- Press Next: add storage
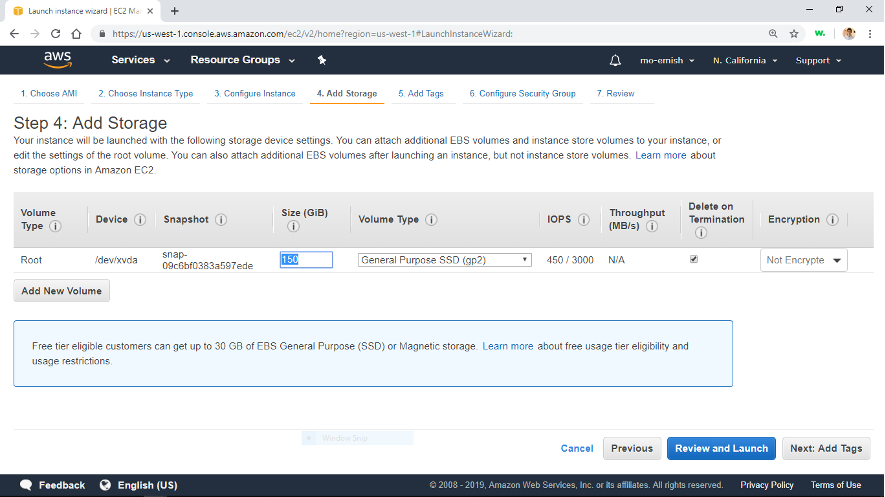
- Choose storage amount for the virtual machine. We used 150 GB as shown below. Choose storage and press Next: add tags.
-
Press Next: Configure Security Groups
-
Under Source column in the table choose My IP to make sure the virtual machine can only be accessed from your computer. You can add more machines later if you choose to. Name the security group and give it a description as show bellow. After you are done press the blue button Review and Launch
 Note: in case you are intending to use RStudio, press add rule, enter 8787 in port, and set source to My IP.
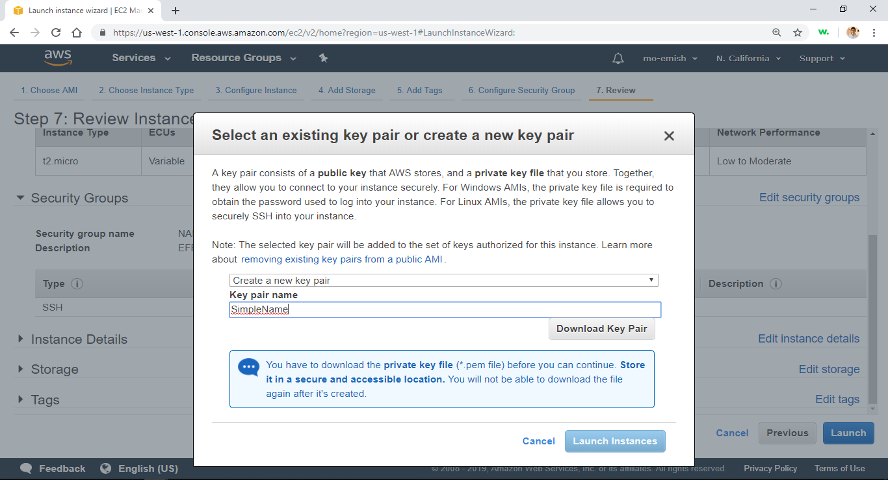
- Press Launch. You will then be asked to choose key pair. Choose create new key pair, give your key pair a simple name, download it, and then press Launch Instance. Figure bellow. Note that key pair is an important file that allows you to access the virtual machine you just created. Make sure its name is simple, it is stored in a place that is easy to access, and always keep a copy of it.
Now in order to access the virtual machine on your computer:
- Change the key pair permissions so that only the current used has full control over it. This step will vary based on which operating system you are using.
- Open Command Prompt on windows, or Terminal on Mac
- Type in the following command:
ssh –i path\to\your\key\pair.pem ec2-user@machine’s Public DNS
###Install Required Software
STATA
To install STATA 15 on EC2 instance:
- Download STATA for Linux in .tar.gz format
- In the same file where the .tar.gz file exists type the command: tar xvzf file.tar.gz
- Make the installation directory /usr/local/stata15 and cd into it on the command line.
- Type
/path/to/extracted/files/install - Follow instructions and make sure to activate the license after installing (type ./statainit and follow instructions)
- In order to add the installation directory to the system path, type the following commands:
echo export PATH="/usr/local/stata14:$PATH" >> ~/.bashrc
source ~/.bashrc
- To run STATA do files type: stata do filename.do
Python
Python 3.7, pip, and other packages To install python 3.7 on EC2 instance:
- Type sudo yum install python3 After Python 3.7 is successfully installed, proceed to install pip using the following steps:
- Type
curl -O https://bootstrap.pypa.io/get-pip.py - Type
python3 get-pip.py –user - Verify pip is installed properly by typing
pip –versionNow, use pip to install the python packages used in code file. The following table shows the commands used to install the required libraries.
Pandas	pip install pandas
Numpy 	pip install numpy
Country_converter	pip install country_converter
pyreadstat	pip install pyreadstat
iso3166	pip install iso3166
pycountry	pip install pycountry
In order to run the python files type: python3 filename.py
R & RStudio
In order to install R type the following command into the EC2 machine: sudo yum install -y R Next install RStudio using the following steps:
Type wget https://download2.rstudio.org/rstudio-server-rhel-1.0.153-x86_64.rpm- After the file is downloaded type
sudo yum install -y --nogpgcheck rstudio-server-rhel-1.0.153-x86_64.rpm
- Make sure you have added a rule for port 8787 in step 9 of the instance setup in order to have access over RStudio from your browser
- Go to the browser (e.g. Google Chrome) and type the machine’s Public DNS followed by :8787
MongoDB
To install MongoDB:
- Download all .rpm files in https://repo.mongodb.org/yum/amazon/2013.03/mongodb-org/4.2/x86_64/RPMS/
- Transfer files using fileZila
- Type sudo yum install filename.rpm for each of these files